
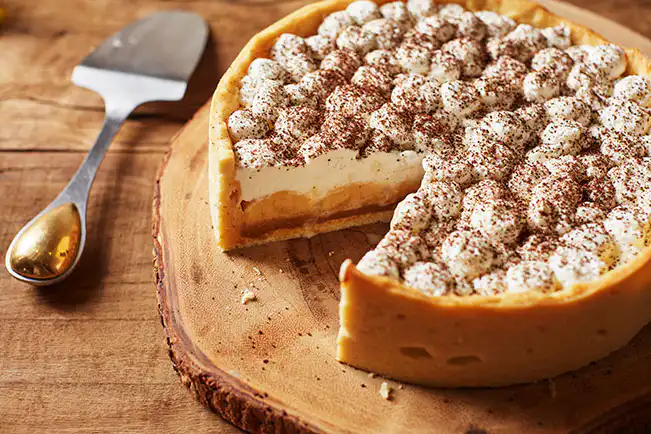

For caramel made with milk
Components
- One can of condensed milk (395 g)
Setup phase
- Peel off the paper label from the condensed milk can and use a knife or spatula to scrape off any remaining glue, as this helps avoid blocking the pressure cooker valve.
- Put the closed can in the pressure pan and add water until it reaches about two fingers above the can. Cover the pan and heat on high. When the valve begins to release steam, reduce the heat and cook for 40 minutes.
- Switch off the heat and wait until all the steam has escaped from the pan before lifting the lid. Using tongs, take the can out of the pan carefully to avoid burns. Allow the can to cool down fully at room temperature for at least 2 hours before opening it. Alternatively, you can prepare the milk can the day before.
For the crowd
Components
- 2 tea cups of wheat flour
- 2/3 cup of granulated sugar
- 125 g of frozen butter cut into cubes
- One egg
- One egg yolk
Setup phase
- Combine the flour and sugar in a big bowl.
- In a small bowl, crack the egg and separate the egg white. Place the yolk in a different bowl – you can save the egg white in the refrigerator for another recipe. Add the egg white to the yolk and whisk together with a fork. Set aside.
- Place the frozen butter into the bowl with the flour and blend by pinching with your fingertips until a crumbly mixture forms. Create a well in the center, add the beaten egg along with the yolk, and knead with your hands until the dough is smooth.
- Shape the dough into a ball and then flatten it into a disk to make it easier to roll out. Wrap it in plastic wrap and chill for at least 30 minutes. In the meantime, prepare a round mold with a removable bottom, 24 cm in diameter.
- After 30 minutes, gently cover the bench and roll out the dough into a disk about 5 cm wider than the diameter of the mold, approximately 0.5 cm thick – dust flour beneath and on top of the dough while rolling.
- Carefully roll the dough onto the noodle roller and then unroll it over the mold. Gently press the center of the dough at the base of the mold, allowing the sides to drape down, ensuring the pie is securely held. Use the tip of your index finger to firmly press the dough into the mold. Additionally, use your hands to press the dough along the edges of the mold to secure it in place.
- Using the back of the knife, trim the excess dough from the edge, leaving a 5 cm tall side – since the dough contracts during baking, the final pie will have the intended height of 4 cm. Place the dough back in the refrigerator for 1 hour before baking (or, if you prefer, complete this step the day before).
- Set the oven to 180 °C (medium heat) and allow it to warm up.
- Take the dough out of the fridge and cut a sizable sheet of foil paper. Lay the foil over the pie and use your hands to press it down, covering the entire bottom and sides of the dough. Fold the edges of the foil over the rim of the pan and fill the base with uncooked beans – this stops the dough from puffing up and cracking during baking.
- Preheat the oven and bake for 30 minutes. Take the pie out of the oven and, being careful not to burn yourself, remove the foil along with the beans.
- Place the pie back in the oven for an additional 5 minutes, or until the edges and bottom start to caramelize. Be careful not to overbake the pie, as it will become hard and brittle once cooled. Take the dough out of the oven and allow it to cool fully before assembling the pie.
No mass remaining?
Use the trims for love-shaped cookies; simply shape and bake.
For installation and enclosure
Components
- 4 fully matured natural bananas
- all confectionery made with baked milk
- A small pinch of salt
- 1¼ cups (tea) of fresh ice cream cream
- 2 tablespoons of granulated sugar
- Two tablespoons of coffee grounds
Mode of preparation
- Once it has cooled, reshape the pie crust and place it onto a large serving platter.
- Put the baked milk candy in a bowl, sprinkle a pinch of salt, and stir with a spoon until it becomes creamy and easier to spread on the pie.
- Put the fresh milk ice cream in the mixer bowl, add the sugar, and begin beating at a low speed. Once it starts to thicken, raise the speed to medium and continue beating until it reaches a firm, whipped cream consistency.
- Using a spoon, evenly distribute the milk candy across the bottom of the pie, creating a smooth layer.
- Remove the peel and slice the bananas lengthwise. Arrange the banana slices on the milk candy, placing the cut side down, in a circular pattern from the outer edge to the center, covering the entire surface—trim the bananas as needed to make them fit better.
- Put the whipped cream into a piping bag and snip off the tip. Spread the chantilly over the whole pie, creating dollops of varying sizes and heights. Continue filling in until the chantilly covers every area, including the spaces between the bananas and between the whipped cream dollops.
- Place the pie in the refrigerator for a minimum of 2 hours before serving – the colder the banoffee, the better (you can also prepare the pie the day before if you like). Before serving, dust the pie with ground coffee using a sieve.

